Add Newsletter Subscription to Your Checkout Page - A Simple Guide
Increase sales and build customer relationships by adding a newsletter subscription option during checkout. Here's how to set it up:
Prerequisites
- Active Squarespace store or Mailchimp account
- Existing mailing list (or create a new one)
Using Squarespace Built-in List
- Go to Payments panel
- Enable "Email signup" option
- Click "Email Signup Settings"
- Select your mailing list
- Customize subscription checkbox text
- Set default checkbox selection (optional)
- Save changes
Using Mailchimp
- Go to Payments panel
- Enable "Email signup"
- Click "Email Signup Settings"
- Connect to Mailchimp
- Login to your Mailchimp account
- Select audience list
- Customize subscription checkbox text
- Configure opt-in settings
- Save changes

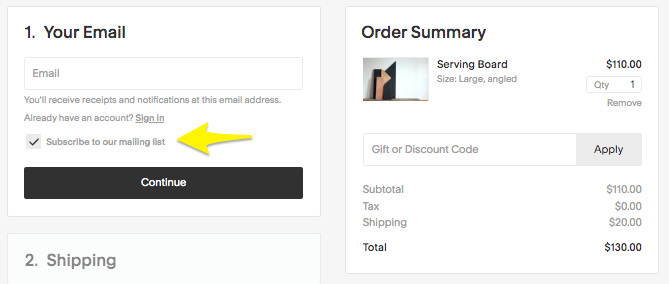
Yellow arrow pointing to button
Additional Tips
- Add signup forms to your website using Newsletter or Form blocks
- Create automated welcome campaigns for new subscribers
- Send targeted emails to encourage repeat purchases
- Consider local laws regarding email marketing compliance
- Monitor subscription rates and adjust messaging accordingly
The subscription checkbox will appear below the email field during checkout. When customers opt-in, their contact information automatically syncs to your chosen mailing list.
This feature helps:
- Build your email marketing list
- Increase customer retention
- Drive repeat purchases
- Create ongoing customer engagement
- Improve marketing effectiveness
For best results, combine with other marketing strategies like automated campaigns, special offers, and personalized content to maximize customer lifetime value.
Related Articles
How AI SEO Services Can Boost Your Website's Search Engine Visibility

