How to Add Newsletter Subscriptions to Your Checkout Process: A Step-by-Step Guide
A newsletter subscription option during checkout can help build your mailing list and boost customer loyalty. Here's how to set it up:
Step 1: Create a Mailing List
For Squarespace:
- Create a list in Lists and Segments panel, or use the default list
- Use Squarespace Email Marketing to engage customers after collection
For MailChimp:
- Create a new empty audience in your MailChimp account
Step 2: Connect Your Account
Squarespace Connection:
- Open Checkout panel
- Toggle Email signup switch
- Click Email signup settings
- Select mailing list from dropdown
- Customize checkbox label
- Set Default check box option
- Save changes
MailChimp Connection:
- Open Checkout panel
- Toggle Email signup
- Click Email signup settings
- Connect to MailChimp
- Log in to MailChimp
- Select your list
- Customize checkbox label
- Configure Default check box setting
Step 3: Configure MailChimp Settings (MailChimp Only)
- Decide whether to enable automatic subscription
- Consider local regulations for opt-in requirements
- Adjust double opt-in settings if needed
Step 4: Finalize Setup
- Save all changes
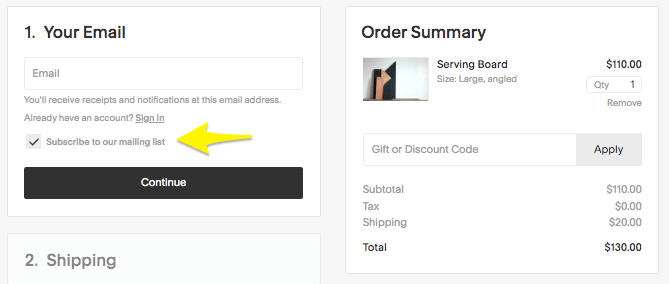
- Verify checkbox appears below email field at checkout
- Test subscription process

Wood table with handles
Additional Growth Strategies:
- Add subscription forms using Newsletter or Form Blocks
- Create automated post-purchase email campaigns
- Set up targeted marketing sequences
- Implement customer follow-up communications
This setup enables automatic collection of subscriber information during checkout, helping grow your email list while customers shop.
Related Articles
14 Proven CTA Examples to Boost Your Conversion Rates

