How to Style and Configure Your Shopping Cart Icon
The shopping cart icon displays the number of items in a customer's cart and directs them to checkout. Here's how to customize it:
Version 7.1 Styling
- Click [Edit] in the upper left corner
- Hover over header and click [Edit Site Header]
- Click [Add Element]
- Toggle [Cart] on
- Click the cart icon then the pencil icon
- Choose your style:
- Icon: Select cart, basket, or bag icon and set size
- Text: Enter custom text (up to 10 characters)
- Border: Choose shape and style (outline or solid)
- Toggle [Show "0" in Cart] to display zero items
- Click [Save]

Black shopping cart icon
Mobile Display
- Text cart icons show number of items
- Initially displays as "(0)"
- [Show "0" in Cart] toggle doesn't affect mobile
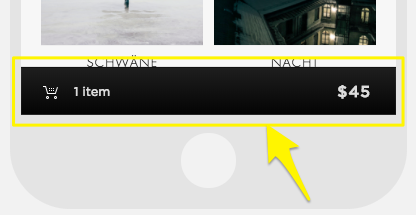
Black shopping cart icon
Template Variations
Classic Button Templates:
- Adirondack, Avenue, Aviator, Bedford, Five, Flatiron, Forte, Galapagos, Ishimoto, Momentum, Montauk, Native, Pacific, Supply, Wells, Wexley
Advanced Styling Templates:
- Brine, Skye, Tremont, Farro, York
Hiding the Cart Icon (Version 7.1)
- Click [Edit]
- Click [Edit Site Header]
- Click [Add Element]
- Toggle [Cart] off
- Click [Save]
Note: When hidden, the cart appears at bottom when items are added. Color can be changed in site styles under [Colors] > [Buttons].
Important Considerations:
- Cart icons automatically appear when items are added
- Some templates display permanent header icons
- Express checkout disables cart display
- Only hide cart with express checkout or subscription products
- Template families like Brine, Farro, Tremont, and York offer additional styling options through site styles
Related Articles
Fonts Discontinued: Important Updates to Available Font Catalog